Clu-block Interface
System Functions
Look at the main interface of Clu-block, it includes five parts, that is, Blocks selection, code edit, text code (hidden), system function and message prompt area. Shown below.

The Clu-Block interface is divided into several key sections:
- Full Screen
- Edit Inputs: you can place the value of the variables in autofill
- CONSOLE OUTPUT: Shows the output of the program when it is run. In addition to being the area where data entry will be requested by the user.
- Guided Feedback & Debugging Tools: Provides useful information during program development. If there are errors, messages will be displayed here to help you identify and correct them.
- View trace: It allows you to change the way the information is displayed and follow the execution of the program step by step.
- TEXT CODE: Shows the Python code generated from the blocks, in addition to being able to write Python code and generating code in blocks
- Blocks area:Contains the available categories and blocks.
- BLOCKS CODE:It is the workspace where blocks are dragged and connected to create the program.
- CONTROL PANEL:Includes the main buttons to interact with the interface

Executes the program.

In the toolbars, you can choose to code with Blocks, allowing you to work with blocks, Text, open a text editor to enter code manually, or Split to work with both at the same time.

Clean the work area, deleting all blocks.
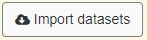
Allows you to import external data for use in the program.

Upload your .py files (from your device)

Save the current project .py (on your device)

Clicking on this symbol places us at the beginning of the code in the block code area

Zoom helps us adjust the size, increase or decrease the size of the blocks in the block area and the blocks code area (zone)

Bin:To delete a selected element, it is dragged over it.
Browsing and Using Blocks
1. Explore Block Categories: In the "Blocks Area" (on the left), you'll find categories like "Variables", "Conditional", "Loops" , "Functions", "Calculation" , "Output" , "Input" , "PyArt Block", "Values", "Data Types" , "String Methods" , "Builtin Functions" , "Classes", "Lists", and "Dictionaries". Click on a category to see the blocks available within it.
2. Drag and Drop Blocks: Click on a block within a category and drag it to the "Blocks Code Area" (the middle area).
3. Connect Blocks: Blocks have connectors that allow you to link them together to create a sequence of instructions. Drag the output of one block to the input of another to connect them.
4. Adjust Blocks: Some blocks have configurable options. Click on the block to access these options.
5. View Code in Text: The "Code in Text Area" displays the Python code corresponding to the blocks you have connected. This helps you understand the relationship between visual programming and real code.
6. Run the Program: Click the "Run" button in the "Control Panel" to run the program. The output will be displayed in the "Console Area."
7. Use the Control Tools:
- Zoom Buttons: The "+" and "-" buttons at the bottom of the "Code in Blocks Area" allow you to zoom in and out of the view of the code in blocks.
- The button with the circle and crossed lines centers the view.
Trash: The trash can icon in the "Code in Blocks Area" is used to delete blocks. Drag the blocks you want to delete to the trash can.
Basic Example
To create a program that prints "Hello World" to the console:
1. Find the "Output" category.
2. Drag the block that prints text to the "Code Blocks Area".
3. Type "Hello World" inside the text block.
4. Click "Run".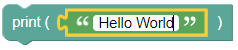
You will see "Hello World" in the "Console Area".